Saturday, March 10, 2012


Tuesday, April 27, 2010
Freezing Asparagus

It's asparagus season here at the farm and this is the first year that our first 6 beds are producing 100%. And boy are they producing! We are cutting a lot more than we can sell (that will likely change this week as the Oxford farmers market will resume being held weekly instead of monthly. Between that, the store and the Farm Share Initiative I am sure in the coming weeks we will unload pretty much everything we harvest. But that has noty been the case the past 3 days. this means we are building up an aging supply of asparagus so instead of selling stalks I feel are too old I decided it is high time to put up some asparagus for the winter today and that is what I did with around 10 pounds of green and purple asparagus.
below are pictures of what I did.

Asparagus all ready to be blanched. What I have done is trimmed the ends to remove any tough fibrous parts and even things up. If the stalks are too long to fit in the pot of boiling water (which means they will not fit into the freezer bag) I cut the stalk in half.


Tuesday, April 13, 2010
Tying Off Drip Tape Ends
Tuesday, July 24, 2007
Prepping Onions for storage
First grow the right kind of onion. Yellow and red onions are great candidates for storage. Sweet onions, not so much.
What we do is cure them before we store them. This involves pulling the onions when the greens have fallen over. You can wait up to a week after the greens have fallen before harvesting. We put the onions on a drying rack of some kind until the greens have turned brown and dried up. Once this has occurred we clean up the onions by removing the top layer(s) of skins that are dirty (but we are careful not to remove too many layers because the onion needs the skin for protection while in storage) and removing the roots by hand pulling them. Be careful with the onions as they do bruise fairly easily and once bruised will not store for more than a few months before rotting
A drying rack is anything that will allow air to circulate all the way around the onions. Eugene made a nice rack last year out of old fridge racks and wood, it has 6 shelves about 1.5' apart and stands about 7' tall. Before that we used hammocks made from chicken wire and other small fencing. This year we will probably have to make a few hammocks out of plastic snow fencing because I have already filled up the drying rack with just 2.5 beds of onions out of 15 beds (we have a great crop this year and planted a lot more this year than in the past). It is essential the onions be in a dry airy place out of direct sunlight that is protected from rain. Onions cannot get wet while curing. A garage or barn is great. In your house would work but know this is a dirty process and you will end up with lots of dirt, onion skins, dead greens and dust all over the place. If you are a married man thinking the house will work for curing remember this sort of thing will piss off your wife. Trust me on this, I have a very, very high tolerance for dirt in the house (we used to bring chickens in on occasion, store all sorts of produce and even clean onions and garlic in the house) and I would never let Eugene cure onions or garlic in the house. Indoor curing could cause divorce so keep this out in the garage, barn or shed.
Once the onions are cured we store them in bushel baskets, these neato waxed produce boxes, that were given to us last year by a friend who trucks items including produce, or plastic produce crates. I would not use 5 gallon buckets as they do not breathe well enough for onions.
Onions are still alive so need a cool/cold place that is dry. They like it between 32F and 50F with humidity around 50% to 70%. If it is too warm (above 50F) they will sprout early and than rot. They can freeze as long as they are not disturbed while frozen and be just fine. If you move them while frozen they will bruise and the bruises will rot and ruin everything.
Sweet onions such as Ailsa Craig, Walla Walla, Vidailia, Granex, Superstar, etc., are not suitable for storage. These onions will a best store 3 to 4 months in he fridge or 2 months at room temperature so we do not bother curing them. We just pull them and cut off the greens, remove the outer skins and the roots and use. We store these onions in the fridge unless they will be sold/used within a week or three.
Another note on cooking onions. For some reason the sweet onion PR folks have been telling the public that sweet onions are great for cooking. They have even duped chefs, who should know better, into believing this. So unsuspecting home cooks now believe that Vidailia onions are a great cooking onion because the Food Network and other places have been telling hem this is so. They are not, sweet onions do not have the sugar content a good storage onion has, which is a big reason it will not store long term. They also do not have the chemical that makes you cry when you cut into one which is why they taste sweet and mild when eaten raw and do not give one heartburn. But when cooked sweet onions, because they do not have much sugar or the crying chemical, are insipid. They cannot caramelize due to lack of sugar (which is why most modern recipes call for the addition of up to a 1/4 cup of sugar in most modern onion recipes) and because they are lacking other chemicals found in abundance in a good yellow (hot) onion have insipid flavor. My favorite cooking onion is Copra, it has fabulous flavor. Unfortunately I will not be growing this onion after this season. Varsity, a new variety for us, also has great flavor when cooked and prince is almost as good. None of these varieties ever need the addition of sugar to caramelize and lend intense onion taste to any dish. Sweet onions should be used raw on sandwiches, burgers, hotdogs and in salads.
Sunday, April 01, 2007
How to Eat A Chocolate Jesus
Banned or not, the fact that a chocolate Jesus has been created begs the question just how does one go about eating a chocolate Jesus?
I asked my friends via email about this and here are the best of the replies
Erika D sez:
Hey Lucy -
I always had the same problem with chocolate bunnies. I could never eat their heads, so eventually my mom just hid a big chocolate egg instead & little toy bunnies sometimes. But you know, I have never had that problem with marshmallow peeps - chicks OR bunnies. Less realistic, I suppose.
x, E.
P.S. I think one should probably not bite Jesus. Just lick him all over until he's just a slimy lump of chocolate and maybe then biting him would be OK.
John W sez:
There are a number of ways to approach chocolate
Jesii, my child.

Apply the chocolate bunny principal and start with the
ears.

Is this particular jesus on a cross?  In that case the
order shall be left arm, body, head, then enshrine the
right arm.

Treat him like a real fancy candle such as little girl
with a watering can.  You would no more think of
burning down this little wax girl than you would
eating jesus.  Put him on your knick knack shelf until
the rapture.
Melinda M sez:
Since this is the holy season of Lent, I believe the correct order would be:

The feet first, to symbolize the cleansing of the feet at passover.

Then gnaw on the back and head, to represent the crown of thorns and the scourging (re: The Passion)

Then on Friday, chomp off the head and bury the rest under a rock until Sunday.

Resurrect the torso and munch down, to represent the ascent into heaven. Extra bonus if the dog pees on the buried chocolate, to represent the descent into hell for a while, although this theology is not as commonly


So how would you eat a chocolate Jesus?
mentioned anymore.

And that's how you eat a chocolate Jesus!
Sunday, August 27, 2006
Tomato Seed Saving
Still have to save for a tasty pink saladette that appears to be a brandywine/sunsugar cross. See what we get out of that next year.
Opalka, a great sauce tomato and one of the parents of the striped tomato we are developing (in our 4th year with these seeds and soon enough should have a stable OP striped tomato with great flavor).
Red pear, a cherry type heirloom that we are breeding the cracking out of.
Yellow pear another heirloom like the red pear 'cept it's yellow and does not crack.
saving tomato seed involves several steps. first you got to ferment the seeds and goo that accompanys them. To do this cut a tomato in half along its' equator. Over a bowl or other container, squeeze the seeds out of the mater. You will have to stick a finger up in the cavaties to extract all of the seeds. Put about a 1/4 of water in the container with the seed goo. Mark the container with tomato variety. Now its' ready to ferment for a few days. Put the seeds out of the way and somewhere where the stench will not disturb you. The concoction if everything is going well will develop a nice film of mold and scum in 24 to 36 hours. Daily, stir the goop lightly and than leave alone. Do this for 3 to 5 days until all the tomato goo has broken down into a liquid slurry. The concoction will reak and likely have a population of fruit flies hovering around it.
It is ready for step two. Take a fine screened sieve and dump the seeds into it and run under cold water to remove the tomato goo. Use your fingers to gently rubs the seeds and release all the goo from them. when clean put the seeds on a coffee filter or cloth (again remember to mark the variety(ies)) and put them in a place out of direct sunlight where they will not be disturbed for several days and let them dry. When they are dry and stuck to the paper/cloth put them in a marked seed envelope or regular envelope and store in a cool, dry, dark place
Wednesday, March 15, 2006
Soil Blocks
For you SB newbies a soil block is something you start seeds in, like a Jiffy pot™. Soil blocks allow air pruning to happen which lessens transplant shock. To use soil blocks you will need a soil block maker or two (Johnny's Selected Seeds has a wide variety of the makers from tiny to huge). We use the mini blocks and the 2" blocks for our seed starting activities. I see there is now a 4" block maker which would be wonderful for tomatoes.
Next you have to have some sort of soil mix to put in the blocks. I use the recipe in Eliot Coleman's New Organic Grower pps 140-1
basic Mix:
(a bucket = 10 qt)
3 buckets peat moss (which has been screened through a .25" hardware cloth)
1/2 cup lime or wood ash
2 buckets perlite or coarse sand (perlite is my choice, sand tends to erode out of the blocks especially if top watered)
3 cups base fertilizer (a 1:1:1 of green sand, kelp meal (Eliot uses blood meal) and colloidal Phosphate)
1 Bucket soil (It is suggested to get this from last year's garlic area)
2 Buckets Compost (screen this like the peat)
Mix everything together thoroughly
For the mini blocks use this:
16 parts peat
1/4 part colloidal phosphate
1/4 part greensand (do not substitute, if you cannot find greensand leave out)
4 parts compost
Mix thoroughly
Okay, now that you have soil mix for blocks the next thing to do is to add water and mix it up so you have something that resembles brownie dough. it should be wet enough so when you pick it up it will make a ball and a bit of water will drip out of the ball of dirt. In other words, we are looking for a cohesive substance. if it is too dry or too wet the soil blocks will not keep together. The best way to test is to make some wet soil and than start making blocks. If they are not keeping together either add more water (a little at a time) or add more soil mix until you have the right consistency. It would probably be a good idea to make 50 to 100 practice blocks before doing this for real. When you are done with the practice blocks just dump them back into the container you are using to make your mud pies in.
I use an old hotel pan (one of those shallow rectangular stainless steel pans you see on a hot buffet line). I use to manage kitchens and picked up several over the years and they work for us but they are pricey. A plastic tub will work quite well for a small project. But if you are doing a lot of blocks a wheelbarrow is nice or, if you have one, a cement mixer (I have not used one but I have talked to people who do use them and they say it works well).
Okay you have your soil mix the perfect consistency, now all you need is something to put the blocks into. I use seedling flats nested in permanest trays so I can bottom water the soil blocks (if you water from the top even with a very fine mist you will cause erosion and the blocks will not be able to air prune the roots so all the seedling roots will grow together thus making transplanting a real pain for both you and your plants. Air pruning of roots keeps transplanting shock to a minimum). If you do not have permanest trays you can use anything that has a lip and will hold enough water to keep your blocks moist. if you do a lot of your own seedlings permanest trays are a good investment. I think they cost around $8 each.
Now take the block maker and plunge it into the wet soil mix so each cell is completely full. I like to make a mound of soil that is higher than the cells are deep and plunge into that and than I check to make sure the soil is packed, but not too well packed. If the blocks are too dense the roots have a hard time getting established. Now take the full block maker and put it where you want the blocks and depress the plunger and Voilà you have your first soil blocks.
Hint:If you are making 2" blocks to put the mini blocks into do not forget to put the mini block pegs (little plastic cubes that screw into the 2" block maker) into the big blocks so there is a perfectly sized depression in the bigger blocks.
Hint: in a tray of 2" blocks be sure to leave a couple of spaces blank so you have someplace to put in water and this also makes it a lot easier to remove the blocks when it is time to transplant
Hint: When it is time to harden off the seedlings make sure they are in a place where rain cannot get to them or the blocks will melt in the rain. If this means moving the trays inside do it.
Friday, February 24, 2006
Some Advice for Local Eaters
I should have baked a cake.
Today I am going to write about eating locally. I don't just grow food for the local market I also buy as much food as I can from local farmers. So this makes me a customer as well as a seller.
Buying as much food as you can locally is a worthy and healthy goal but it is not easy. Over the years most of the local agriculture infrastructure has been utterly destroyed to make way for the Green revolution agribusiness model. this means that few farms are growing for the local market and the farm to market ties have been badly broken since after WWII. That's the bad news. The good news is this is changing as more and more small to medium farms become diversified and geared towards selling direct to their customers and also more and more marketing opportunities are being developed all the time. there are more farmers' markets than we have ever had in this country. CSA's are increasing each year. When I started Boulder Belt CSA there were something like 1500 CSA in the entire country now there are at least 3x as many and every state in the union has at least one. And there are more and more farm stands coming into being. For the customer it has definitely become a lot easier to buy locally at least 8 months out of the year.
Locating the food is really only half the battle (though it may seem like so much more when you are in the hunt). The other half is dealing with the food once you have located it. buying local often means buying whole unadulterated foods in the raw. this is something most modern consumers are not used to. Most people buy a lot of processed foods that are ready to eat and can be stored easily. And people are used to having year 'round availability of all foods. This is not the case with local foods and that means one has to plan ahead, often months ahead. One has to do their own processing (canning/freezing/dehydrating) and one has to have equipment to do that.
The basic equipment I recommend is the following:
A salad spinner
A pressure canner
Canning jars and lids/rings (you can jars way cheap at auctions. Buy lids and rings new)
A jar lifter (for lifting hot jars out of the canner, you cannot can without this)
A canning Funnel (for no mess pouring of food into canning jars)
A chest freezer (very important if you eat meat but also incredibly handy for produce too)
A Victorio Strainer (this separates seeds and skin from pulp for things like making fruit jellies, tomato sauce, etc.)
A Couple of big Stainless Steel Pots (3 gallon or bigger, 5 is a real nice size)
A dehydrator (I have several kinds from dirt cheap to top of the line, to begin with go cheap)
Freezer zip lock bags
Food grade buckets with lids (for storing grains, dried beans, flour, etc.. I use all sizes from quart yogurt containers on up to 5 gallon buckets. Never use anything that is not food grade like drywall mud buckets)
Food processor/blender (if you love pesto you will need this)
Herb Grinder (coffee grinder dedicated to herbs and spices or mortar and pestle)
A Metal Colander
Baking Sheets (for freezing fruit, not baking)
These are the basics in my kitchen for what I eat. I don't do a lot pickling/fermenting so I do not have pickle crocks but if you plan of fermenting food you will need at least one and there is probably other things I have not mentioned. If you see any omissions put 'em in the comments.
One thing local foods eaters need is a root cellar of sorts. This is a place that is dark and cold but not freezing and well ventilated. A basement can work, so can a garage or closet or if you have a yard you can dig a cellar into the ground. This is where the bulk of the winter veggies will be stored. The things we cellar are onions, garlic, winter squash, beets, carrots, parsnips, turnips, rutabagas, potatoes and apples. I am not going to get into how to store these items because it is a topic beyond the scope of what I want to talk about today. Go to Back 40 Books for some great titles on root cellaring. Herm Beck-Chenoweth and Linda Lee, the owners of this business are great folks who know a lot about simple living and sell the best books they can find on simple living/local eating/sust. ag topics.
Like most things in life there is a lot more than meets the eye in this eating local foods idea. It takes a lot of preparation to be able to have the bulk of your diet (more than 50%) be local foods. You have to have the proper equipment and know how to use it or you will be overwhelmed and will very likely back away from the goal of an all local foods diet. You have to teach yourself to plan months in advance instead of days or hours in advance for your meals. You have to learn how to can and freeze (neither is hard to learn and a great resource is Martha Stewart.com to learn more about these skills) and you have to learn how to store things properly. It takes time to do all of this so do not think you will one day wake up and start an all local foods diet-it won't work. but it will work if you take several years and add a few new skills and new foods/sources to your repertoire each season.
Sunday, February 19, 2006
Hoophouse how To-Part 3
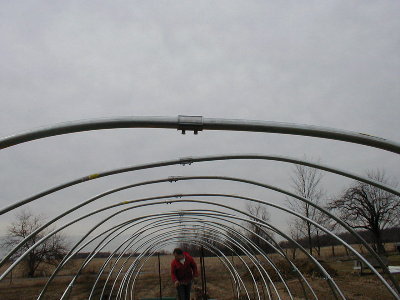
Detail of how 10’ conduit is held together

Trench for anchoring plastic. Either a shovel or plow will work. What we do is turn the soil and move it to the edge of the trench, put the plastic over the frame, center it than put the edges in the trench and with a shovel put the soil back over the plastic.
Finished hoophouse. the edges are kept down with large rocks, tires, milk crates filled with rocks. Any heavy but movable item.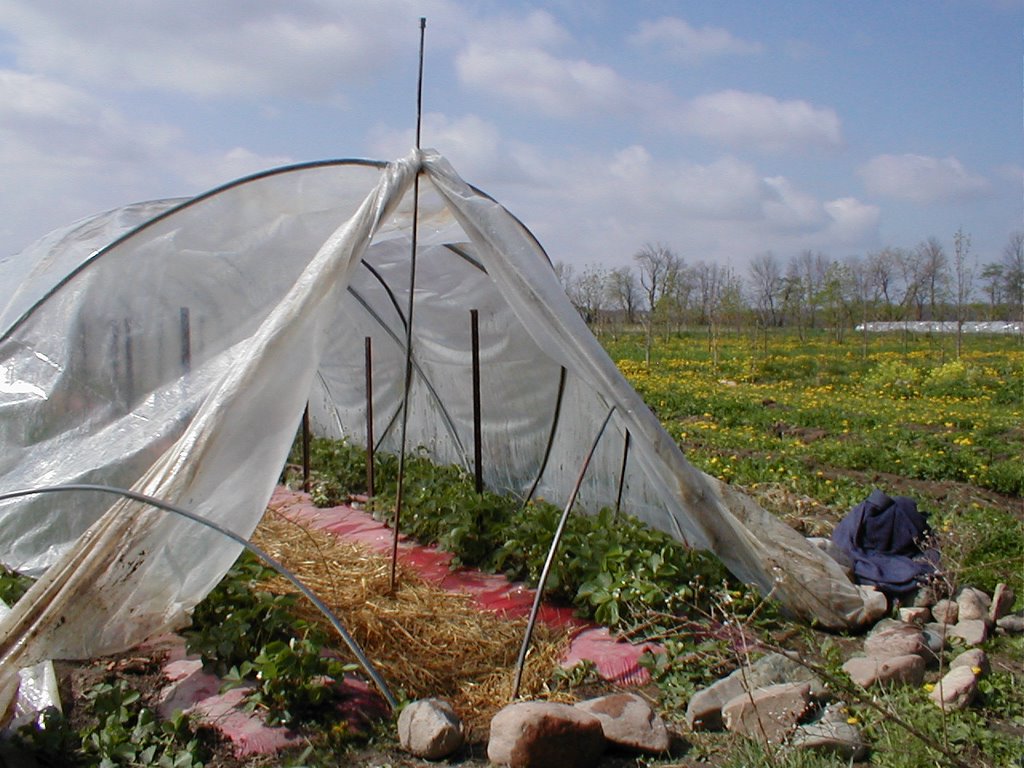
Detail of how we keep ends open and the houses vented in warm weather using a pole stuck between the plastic and a hoop. In hot weather (above 80˚F) we will dig up one edge of the plastic and take it off the hoops and leave it to the side (so it can be put back on quickly if we get a cold spell which has happened the past 6 springs-weeks of hot weather followed by a frost.)
A few things I should mention. You will need to irrigate in a hoophouse. We use drip irrigation. The irrigation and plastic mulch, if you are using that, need to go down before the hoophouse goes up.
If you are doing tomatoes or anything else that will be trellised get the materials you will be using erected before the plastic goes on. You cannot use a post driver with 2' of head space for a 7' fence stake.
The rebar needs some discussion (and some photos too but I don't have any right now). we put washers on the rebar so it does not sink too far into the ground. without the washers the wind will pound the rebar and conduit into the ground sometimes 2" or more so the houses get rather short. The washers stop this. We have used big (2") metal washers as well as pieces of 2"x4" with holes drilled in them for the rebar.
The structures are passively heated. we do not use any auxillery heat but we do suppliment heat with buckets of water, dark mulches and row covers.
That is it. Simple to put up with no power tools. It takes about 2 to 3 hours for one person to put one of these structures up if they do not have to bend conduit (which you only have to do once but will add several hours to the task). It takes about 45 minutes to take one down with one person. If you have several people you can put one up in about 10 minutes (we did this at a farm tour/workshop we had a few years ago-had 10 people put up one of these complete with plastic dug in in about 15 minutes with only one person knowing what to do).
Hoophouse How To-Part 2

bending conduit with a pipe bender
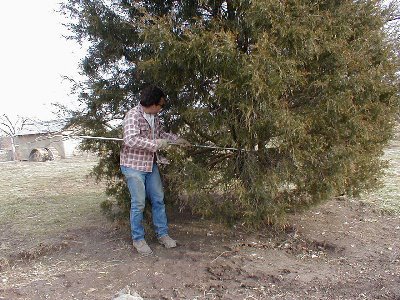
Using a tree to bend conduit (this tree was NOT sturdy and we broke it a few minutes after this picture was taken so if you go this route use a STURDY Tree)
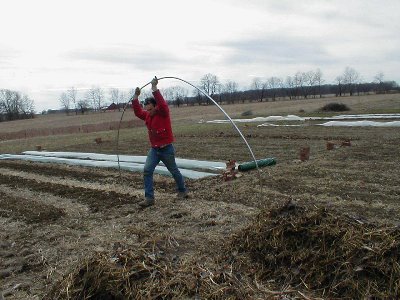
Erecting part of a section (i.e. 2 pieces of conduit bent and fasten together with a connector)
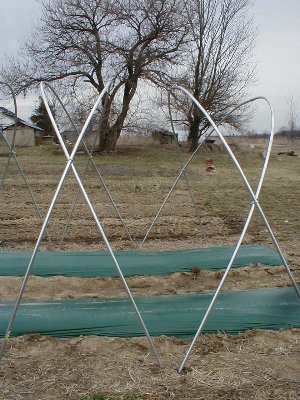
Two complete sections. These would have rebar driven in to the ground at a complementary angle that the conduit would slip over and be anchored to the ground.
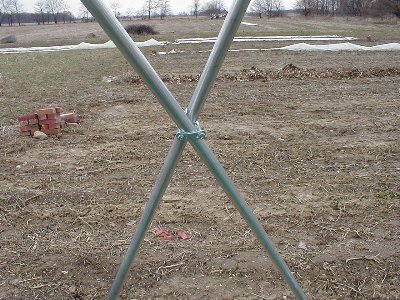
Detail of how two sections are connected together
Stay Tuned for Part 3 Coming very very soon
Hoophouse How To-Part 1 What you need

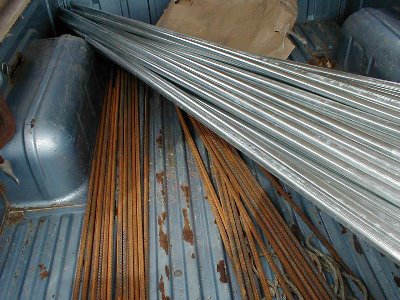
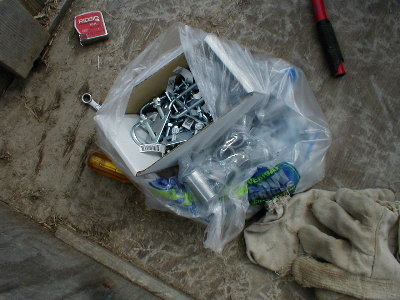
Here is what you need tool wise.
1” to 1 1/2” metal conduit in 10’ or 20’ lengths (if using 20’ lengths no need for connectors)
greenhouse plastic-6mil, UV stable (not shown)
connectors
rebar
clamps
hammer
wrenches
screwdriver (slotted)
pipe bender or sturdy tree
Part two will deal with Construction